4 minutes
How i back up my personal images
As you may know, I have three children. When you have a family, a lot of photos come together. Just think of the first steps, birthdays, family celebrations, etc. In the meantime a considerable number of photos has accumulated. Of course, I don’t want to lose them due to a broken hard drive or the like. So a backup strategy was needed. I would like to explain this backup strategy in more detail below.
The main idea is to have a all the data on an external hard drive, but synced with an AWS S3 bucket. So the heart of my backup strategy is S3. For those who don´t know S3 yet: S3 is a highly available and highly redundant Object store managed by Amazon Web Services (AWS). If you want more details, have a look at the key facts here.
The “workflow” now is as follows: Copy images from all the sources to my external hard drive. Use S3 sync to synchronize the local content with that from S3. Use lifecycle policies to move unmodified images to an other storage class (Glacier) to reduce costs. The images are uploaded to S3 using the Infrequent Access storage class which is designed for files that are not accessed very often. This is possible, because viewing images can be done directly from my external hard drive. Using this storage class further reduces costs.
Let´s see how this can be achieved.
Configure S3 Bucket
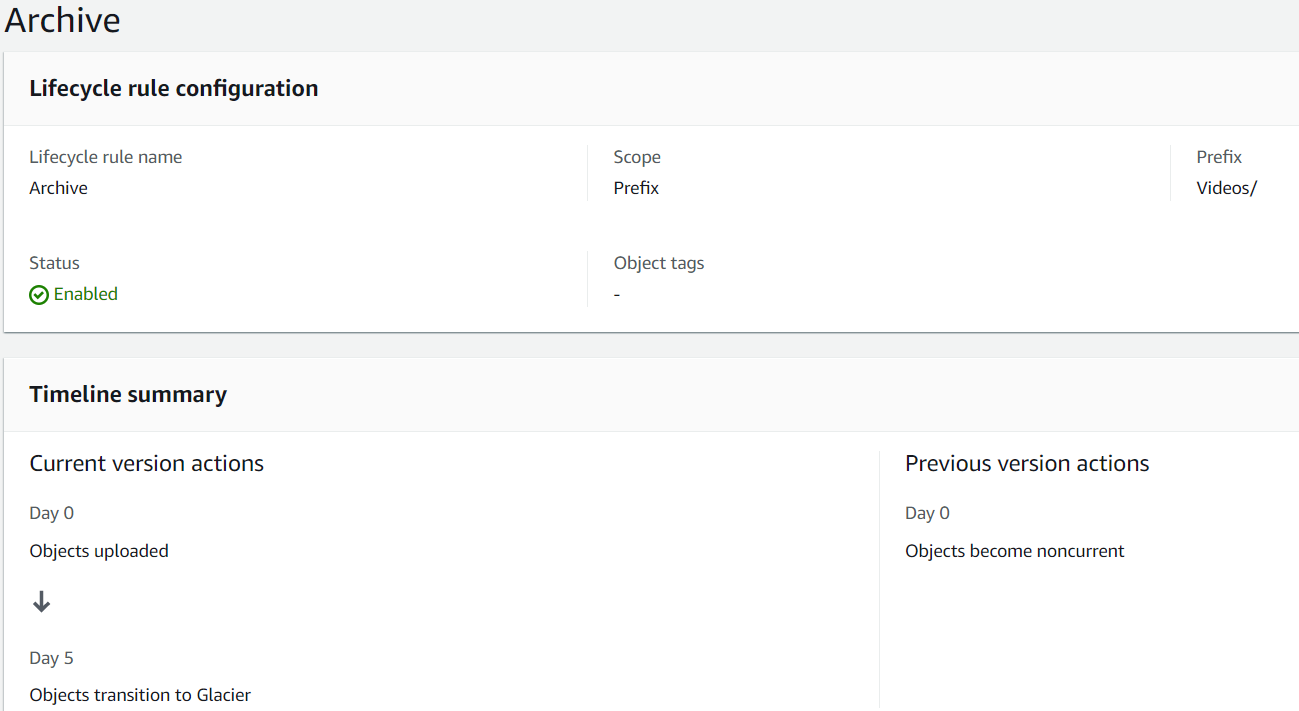
The first thing to do is to create an S3 bucket in the targeted region. You can leave the default settings. Once your bucket is in place, choose it in the AWS console and switch to the Management tab. Click on Create lifecycle rule and provide it a name. Now you can specify the details. I personally chose to only archive Videos as many small files (my images) can cause higher cost when archiving them than when you leave them untouched. To do that, I specified a prefix. The details for me look as follows:
- Choose rule scope: Limit the scope of this rule using one or more filters
- Filter type: Prefix (Videos/)
- Lifecycle rule actions:
- Transition current versions of objects between storage classes
- Delete expired delete markers or incomplete multipart uploads
- Transition current versions of objects between storage classes:
- Storage class transitions: Glacier Deep Archive
- Days after object creation: 5
- Delete expired delete markers or incomplete multipart uploads: Delete incomplete multipart uploads
- Number of days: 7

After having the bucket configured, make sure you obtain an API key and configure your AWS CLI properly.
Configure local storage
Now that we have our S3 bucket in place, we can focus on the local storage. As mentioned earlier, I bought an external hard drive tro store images and videos on them. To make management easier, I created a folder Media with two sub folders Videos and Images.
Upload media to S3
We have the S3 and we have the local storage but how to keep them in sync? I use the aws cli for that as it comes with a very handy sync option which does exactly that. By providing parameters, it is possible to control the synchronizing behavior. The following command is the command I use to sync my data:
D:\media\Videos>aws s3 sync . s3://<bucketname>/Videos/ --storage-class STANDARD_IA --region eu-central-1 --size-only --delete
This command checks if local data is already present in the S3 bucket. If it´s not, it will be uploaded. It furthermore compares existing files and replaces them, if the file size differs. The –delete option tell the cli to delete files from the bucket, when that file does not exist locally. I highly recommend using the –dryrun flag on the first run to see, if the command does what it is supposed to do.
Retrieving data
The best backup strategy is worthless if you can´t retrieve your data when it is required. If you are, like me, using Glacier for long-term archival, you have to create a retrieval request first. After the request has been completed, you can download the data using AWS cli again by switching the locations (in the example above, the dot [.] told the cli to upload content from the current directory to S3). You should use the S3 cp command for that. See here for some examples.
Comments